Showing posts with label Granny Square. Show all posts

Thursday, September 20, 2018

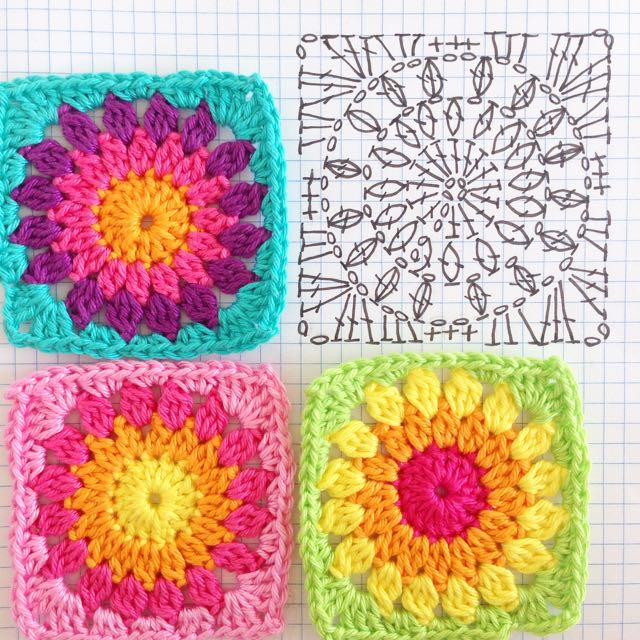
New Flower Square


Those of you who follow me on Instagram already know I've designed a new grannysquare. Today I made a chart pattern for you guys to use. I plan to make a tutorial next week. My first after a looooooong time. Exciting!!


I've loved making these squares. They are so bright and colorful and I love how they make me feel while making them.


My favorite shade of pink is no longer available and I must admit, that kind of made me angry at first. How could they??? But than I started using the new pink, a little brighter, a little more 'in your face' and I kinda got used to it. It really pops out, don't you think?


For those of you who comment on my blog, I love you for it, but I have a problem with opening/reading them. It kind of sucks, because I love to communicate with you and I so appreciate your involvement. Therefor, if you feel the need to respond, please do it on Instagram (JennPoort). It's also possible to comment through Bloglovin'.  I'll make sure to get back to you there!


Hope you enjoy the chart! Have fun!!


Follow this blog with Bloglovin'

Wednesday, July 9, 2014

Crochet Pattern Granny Square Blanket


TI'm done! The (English) Crochet Pattern Colorful Granny Square Blanket is in the Color 'n Cream Shop.


This is by far my longest tutorial yet. I'm quite proud of it, actually. I think it's very clear and detailed, as usual. So now you guys can make this pretty blanket for yourself!


It's been very rainy here these last few days. I love it actually. A little time to wear long sleeves and socks and stay in for a few days. We are crafting and watching movies... Lovely!


The Sunday Market was fun, although I didn't sell much/anything. It wasn't the right place for me, but the atmosphere was so nice and very inspiring. I wouldn't want to live in Amsterdam, but when I visit there I always come home totally inspired. Do you have a city you love??


Now I'm working on the new Flower Coaster Pattern, and after that I will get started on the Pink Flower Doily Pattern. I have lots and lots in store for you!


I hope to be back tomorrow, but I can't make any promises at the moment. The holiday is coming our way and my girls are pretty hyper. I need to distract them with little trips to sand and water, or grass and farm animals, stuff like that. Oh how I LOVE  summer!

Have a rainy day!

Follow this blog on Bloglovin'

Friday, April 25, 2014

Mastering The Basics: Classic Granny Square Tutorial


Over the last few months I got a lot of questions about the pattern for my Granny Square Color Bomb Blankets. It's a classic granny square, and for those of you that aren't familiar with it yet, I made a small tutorial to show you how simple it is. This is the first pattern I've used ever when I started crochet. Have Fun!!


Stitches (US Terms):
Magic Circle: Mc
Chain: Ch
Double Crochet: Dc
Slip Stitch: Ss


Start with a magic Circle. use the pic's above, or use a Youtube video tutorial (I will have one available soon...) for instructions. I always start my projects with a Magic Circle since it looks so much better when you are finished. If you don't like the Magic Circle, just chain 3 and join with a ss.


Round 1: Chain 2, 2 dc into the ring, ch 2, 3 dc into the ring,*3 dc, ch 2 3dc into the ring*, Repeat *to* 2 more times, Join with a ss.


If you want to proceed in the same color, ss into the next dc from the previous round and ss around the ch 2 from the previous round (see pic's 8-12). Than you can start the next round. (If you change color, skip this part and just start in any ch 2 space).


Round 2: Ch 2, 2 dc, ch 2 3 dc into the ch 2 space of the previous round. *3 Dc, ch 2, 3 dc into the next ch 2 space.* Repeat *to* 2 times. Join with a ss. 
If you proceed in the same color, use the same way as in the round before to go to the next round. (See pic's 14-19).


Round 3: Ch 2, 2 dc, ch 2, 3dc into the ch 2 space of the previous round. 3 Dc into the next space, *3 dc, ch 2, 3dc into the next ch 2 space. 3 Dc into the next space*. Repeat *to* 2 times. Join with a ss.


You can make the square a big as you like by just repeating the steps. Just make sure you use each space between 2 3dc's from the previous round. Of course, you can also use several colors instead of 1. I really love this pattern, since it's so easy and it always looks so good! 


I will try to finish the Join-as-You-Go Tutorial next week, so you can really get going. 


I hope it's all clear. If you have any questions or suggestions, please let me know!


Oh, and about the edging... I'm working on some Simple Edging Tutorials for you guys, but again, I need some time.


Have a nice weekend!
Related Posts Plugin for WordPress, Blogger... 01 09 10