It took me some time to write this post, but I've had a BIG (small) distraction. Last thursday we went to pick up or new family member, a little puppy. She's quite a handful but super sweet. I have to follow her moves all day and since I have CFS that sometimes costs me all of my energy.
We thought having a dog might help me get up on my feet again a little bit sooner. It will get me outside more and there have been tests showing that owning a pet is good for your health. I think it will be, but for now it is a bit much, haha. But everybody loves her and she already belongs to our family.
Don't worry. I have been busy crocheting as well... Almost done with 1 of my unfinished projects. Here a quick peek...
I will show you more once it's done. Hopefully SOON...
Have a nice day!
Wednesday, January 9, 2013
Friday, January 4, 2013
Tutorial Vintage Flower Potholder
Well, here it is: The Flower Potholder tutorial!! It took me so much time, but I'm so proud to share it with you!
I used regular cotton and a size 3 hook. Be sure to crochet this potholder tight, than it will function better. Choose your colors carefully. Put them together and make a sketch if you can. You don't want to be halfway discovering you don't like the look of it.
Well, there we go...
Round 5/6: Change color and begin in any stitch you want. Ch 3, 1dc, ch1, 2 dc, * skip 2 stitches, 2 dc, ch1, 2 dc, repeat* 13 times, join with a sl st in the third ch from the first ch 3. (For round 6, start in one of the ch 1 spaces)
Round 7/8: Change color, start in one of the ch 1 spaces, ch 3, 2dc, ch1, 3 dc, *3dc, ch 1, 3 dc, *repeat 13 times, join with a sl st in the third ch from the first ch 3.
Round 9: Change color, start in one of the ch 1 spaces, ch3, 2dc, ch 2, 3 dc, * 3 dc, ch2, 3 dc, repeat*13 times.
If you don't want to change color, like I did in the back of the potholder, this is a nice method to start each upcoming round: join the first round with a sl st, sl st in next dc, sl st n the chain 1 space, then start the new round as written above.
Congratulations! You have finished your front now. Time for the back. Again, choose your colors carefully. After finishing both, finish of the loose ends before you start joining them. The joining part is a bit tricky at first. Be careful with your hook. You don't want to pull along all sorts of loops...
For joining: Place the 2 sides back to back,( make sure you have the front pointing towards you) start in the middle of a pettal (both sides), ch1, 2 sc in next stitch (this goes for all the trebbles!) When you come to the middle of 2 pettals, make sure your yarn is right from the hook (first pic), the hook goes in, the first space between rounds 9 (back and front), from the back, yarn over, pull it through so you get 2 loops on the hook (this is tricky at first, you have to make a little turn and it's easy to take other loops with you...), yarn over and pull it through both loops. (It's just a sc around each round), ch 1 and repeat this until your flower is done. Look at the pictures closely. It's sc than ch 1.
When you're at the middle of the flower start by working your hook through the back, and the second one from the front. That's where you turn around.
This will take some practice, but you will get better at it every time.
That's it! Wow, I'm going to get me a cup of tea...
Hope it's clear to all of you. Please let me know if you miss anything, or I made mistakes. And I would love to see the results of course!!
I used regular cotton and a size 3 hook. Be sure to crochet this potholder tight, than it will function better. Choose your colors carefully. Put them together and make a sketch if you can. You don't want to be halfway discovering you don't like the look of it.
Well, there we go...
Chain 4, join with a slip stitch.
Round 1: Chain 3, then add 14 double crochets into the circle. (total 15 dc) Join with a slip stitch.
Round 2: (Change color if you like) chain 3, *2 dc into next stitch, repeat * 13 times, than 1 dc into the same stitch as the first ch 3, join with a sl st (total 30 dc).
Round 3: (Change color if you like) Ch 3, *1 dc in next stitch, 2 dc in next st, *repeat 13 times, 1 dc in next st, 1 dc in same stitch as first ch 3. (total 45 dc)
BE SURE TO COUNT YOUR STITCHES!!! It's very annoying when your finished and the flower has only 14 petals... (believe me, I know)
Round 4: Join with the color you want to use for the edging, Ch 1, 1 single crochet in every stitch, join with a sl st. (Or use the method shown on these pictures for a prettier result when joining). This round is optional. You could leave it out if you want to. I like it better with, but you might not.
Round 5/6: Change color and begin in any stitch you want. Ch 3, 1dc, ch1, 2 dc, * skip 2 stitches, 2 dc, ch1, 2 dc, repeat* 13 times, join with a sl st in the third ch from the first ch 3. (For round 6, start in one of the ch 1 spaces)
Round 7/8: Change color, start in one of the ch 1 spaces, ch 3, 2dc, ch1, 3 dc, *3dc, ch 1, 3 dc, *repeat 13 times, join with a sl st in the third ch from the first ch 3.
Round 9: Change color, start in one of the ch 1 spaces, ch3, 2dc, ch 2, 3 dc, * 3 dc, ch2, 3 dc, repeat*13 times.
If you don't want to change color, like I did in the back of the potholder, this is a nice method to start each upcoming round: join the first round with a sl st, sl st in next dc, sl st n the chain 1 space, then start the new round as written above.
Round 10: Change color, start in the ch 2 space, Ch 4, 4 trebbles, *sl st, 10 trebbles, repeat* 13 times, 5 tr, join with a sl st.
Congratulations! You have finished your front now. Time for the back. Again, choose your colors carefully. After finishing both, finish of the loose ends before you start joining them. The joining part is a bit tricky at first. Be careful with your hook. You don't want to pull along all sorts of loops...
For joining: Place the 2 sides back to back,( make sure you have the front pointing towards you) start in the middle of a pettal (both sides), ch1, 2 sc in next stitch (this goes for all the trebbles!) When you come to the middle of 2 pettals, make sure your yarn is right from the hook (first pic), the hook goes in, the first space between rounds 9 (back and front), from the back, yarn over, pull it through so you get 2 loops on the hook (this is tricky at first, you have to make a little turn and it's easy to take other loops with you...), yarn over and pull it through both loops. (It's just a sc around each round), ch 1 and repeat this until your flower is done. Look at the pictures closely. It's sc than ch 1.
When you're at the middle of the flower start by working your hook through the back, and the second one from the front. That's where you turn around.
This will take some practice, but you will get better at it every time.
That's it! Wow, I'm going to get me a cup of tea...
Hope it's clear to all of you. Please let me know if you miss anything, or I made mistakes. And I would love to see the results of course!!
And there they are. Perfect to use! They always cheer me up!
Have a very happy weekend!
Wednesday, January 2, 2013
Resolutions
HAPPY NEW YEAR everybody!!! Thank you for joining me in the new year. Time to throw out all the christmas decorations and in with some fresh new stuff.
Normally I don't make them, New Years' Revolutions, but crafty wise I have to this year. As you might have noticed I started about a thousand projects, but haven't finished a lot of them lately. So I'm making a to-do-list... And it's totally illegal for me to start anything new until I've completed at least 3 of them. Yep, that sounds about right.
First some of the projects I did finish, for encouragement. I love that I learned to put some pictures together in a frame last week! Now the pictures don't take up so much space...
Doesn't it look pretty and colorful all together?? They make nice collages.
But now for the unfinished ones...
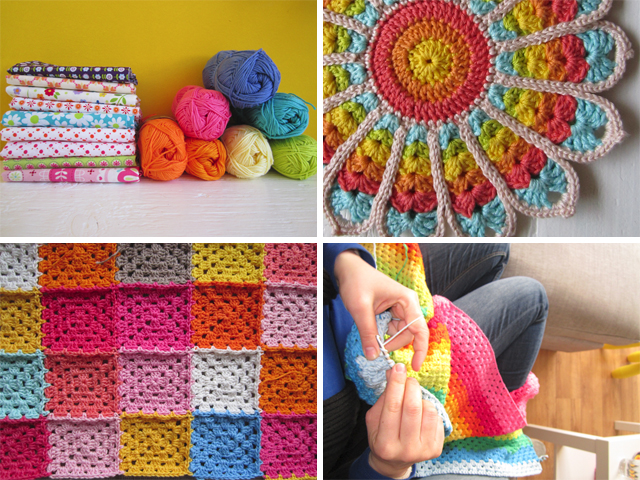
I'm only showing you a few, 'cause it's too depressing otherwise. The first picture shows you all the beautiful fabric I bought a few months ago. I want to make some pillows with matching yarn. I'll make a tutorial on how to make the crochet/fabric backings.
The second picture shows a pretty potholder, missing a brother and also a tutorial I promised (which I am working on... It's just a lot of work).
The third is the Color Bomb Blanket, which has been lying around, untouched for weeks. That's not right! It's so beautiful and fun to make.
The last picture show you my newest project. The rainbow blanket for my little one. It's going to be quite big, so I might want to stall that one a little bit....
Anywho, enough to do for me. Don't have to bore myself this year.
What are you guys working on??
Have a very lovely day in January!
Normally I don't make them, New Years' Revolutions, but crafty wise I have to this year. As you might have noticed I started about a thousand projects, but haven't finished a lot of them lately. So I'm making a to-do-list... And it's totally illegal for me to start anything new until I've completed at least 3 of them. Yep, that sounds about right.
First some of the projects I did finish, for encouragement. I love that I learned to put some pictures together in a frame last week! Now the pictures don't take up so much space...
Doesn't it look pretty and colorful all together?? They make nice collages.
But now for the unfinished ones...
I'm only showing you a few, 'cause it's too depressing otherwise. The first picture shows you all the beautiful fabric I bought a few months ago. I want to make some pillows with matching yarn. I'll make a tutorial on how to make the crochet/fabric backings.
The second picture shows a pretty potholder, missing a brother and also a tutorial I promised (which I am working on... It's just a lot of work).
The third is the Color Bomb Blanket, which has been lying around, untouched for weeks. That's not right! It's so beautiful and fun to make.
The last picture show you my newest project. The rainbow blanket for my little one. It's going to be quite big, so I might want to stall that one a little bit....
Anywho, enough to do for me. Don't have to bore myself this year.
What are you guys working on??
Have a very lovely day in January!
Sunday, December 30, 2012
Somewhere Over The...
When packages like this arrive by mail only 1 day after I placed an order I'm happy...
And then, when you wake up and walk downstairs, not thinking about it, ('cause you have to start up a new day, make sandwiches, tea, eggs) and walk into the living room to see THIS I'm just totally excited! By daylight the colors always look better.
The reason of this 'yarn greed' is my long stalled decision what to do with the pretty, soft and thick cotton I bought some time ago. Remember?
It's going to be a rainbow blanket for the little ones' new bed. The cotton is just wonderful, although the yarn does split (a lot...). I use a 4,5 needle, so it progresses quite fast.
I love to work with all the rainbow colors, but you already knew that, didn't you? Well, now you know what I'm doing this weekend. Hope you have fun too!
See you next year, probably. Have fun on new years' eve. And a happy new year to all of you!!!
But when I open it and it bursts into color before my eyes I'm overwhelmed with joy and happiness... Silly isn't it? Although I'm sure you will all recognize the feeling, right? RIGHT???
And then, when you wake up and walk downstairs, not thinking about it, ('cause you have to start up a new day, make sandwiches, tea, eggs) and walk into the living room to see THIS I'm just totally excited! By daylight the colors always look better.
The reason of this 'yarn greed' is my long stalled decision what to do with the pretty, soft and thick cotton I bought some time ago. Remember?
It's going to be a rainbow blanket for the little ones' new bed. The cotton is just wonderful, although the yarn does split (a lot...). I use a 4,5 needle, so it progresses quite fast.
I love to work with all the rainbow colors, but you already knew that, didn't you? Well, now you know what I'm doing this weekend. Hope you have fun too!
See you next year, probably. Have fun on new years' eve. And a happy new year to all of you!!!
Saturday, December 29, 2012
Quick Fix
Just something I made last night when me and my love were sitting side by side at the same desk. I always love it when we work next to each other...
I have heaps and heaps of buttons (took them home from Thailand too) so thought it would be nice to use them in this 3D picture frame. And I wanted to use the music sheets I bought at the thrift shop. I think I like the results...
Drawing is where it all began when I was little and it always makes me happy. I especially love markers. All those lovely colors.
As I said, this was going to be quicky.
Have a nice weekend!
I have heaps and heaps of buttons (took them home from Thailand too) so thought it would be nice to use them in this 3D picture frame. And I wanted to use the music sheets I bought at the thrift shop. I think I like the results...
Drawing is where it all began when I was little and it always makes me happy. I especially love markers. All those lovely colors.
As I said, this was going to be quicky.
Have a nice weekend!
Subscribe to:
Posts (Atom)